
This is a continuation of the last time.
This time, we will use the sample sketch of YMF-825 to make various sounds.
Sample sketches were posted on GitHub.
Please refer to the following.
YMF-825 sample sketch
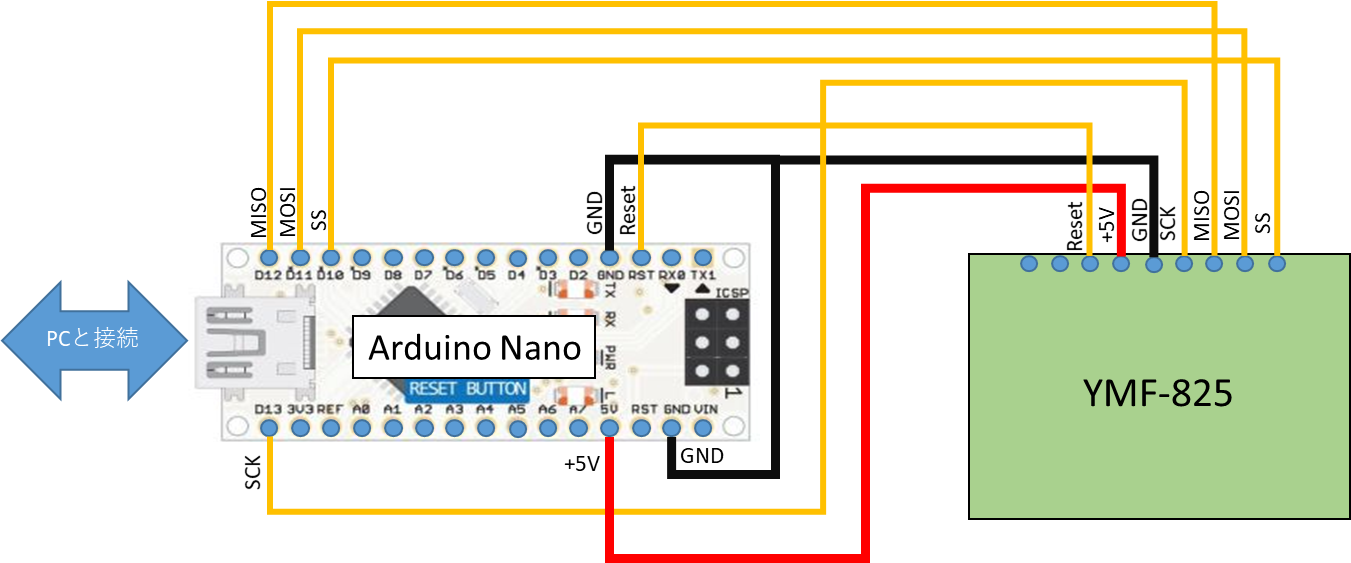
Write this sample sketch to Arduino Nano.
When you open the folder on GitHub, you will find the following files.

The program of sample1 in this is used this time.
The program ofsample1 is shown below.
/*
 Conditions only for Arduino UNO
   RST_N- Pin9
   SS   - Pin10
   MOSI - Pin11
   MISO - Pin12
   SCK  - Pin13
 */
#include <SPI.h>
//0 :5V 1:3.3V
#define OUTPUT_power 0

// only for Arduino UNO
void set_ss_pin(int val) {
    if(val ==HIGH) PORTB |= (4);
    else PORTB &= ~(4);
}

// only for Arduino UNO
void set_rst_pin(int val) {
    if(val ==HIGH) PORTB |= (2);
    else PORTB &= ~(2);
}

void if_write(char addr,unsigned char* data,char num){
  char i;
  char snd;
    set_ss_pin(LOW);
    SPI.transfer(addr);
    for(i=0;i<num;i++){
      SPI.transfer(data[i]);
    }
    set_ss_pin(HIGH);
}

void if_s_write(char addr,unsigned char data){
  if_write(addr,&data,1);
}

unsigned char if_s_read(char addr){

    unsigned char rcv;

    set_ss_pin(LOW);
    SPI.transfer(0x80|addr);
    rcv = SPI.transfer(0x00);
    set_ss_pin(HIGH);
    return rcv;
}

void init_825(void) {
   set_rst_pin(LOW);
   delay(1);
   set_rst_pin(HIGH);
   if_s_write( 0x1D, OUTPUT_power );
   if_s_write( 0x02, 0x0E );
   delay(1);
   if_s_write( 0x00, 0x01 );//CLKEN
   if_s_write( 0x01, 0x00 ); //AKRST
   if_s_write( 0x1A, 0xA3 );
   delay(1);
   if_s_write( 0x1A, 0x00 );
   delay(30);
   if_s_write( 0x02, 0x04 );//AP1,AP3
   delay(1);
   if_s_write( 0x02, 0x00 );
   //add
   if_s_write( 0x19, 0xF0 );//MASTER VOL
   if_s_write( 0x1B, 0x3F );//interpolation
   if_s_write( 0x14, 0x00 );//interpolation
   if_s_write( 0x03, 0x01 );//Analog Gain

   if_s_write( 0x08, 0xF6 );
   delay(21);
   if_s_write( 0x08, 0x00 );
   if_s_write( 0x09, 0xF8 );
   if_s_write( 0x0A, 0x00 );

   if_s_write( 0x17, 0x40 );//MS_S
   if_s_write( 0x18, 0x00 );
}

void set_tone(void){
  unsigned char tone_data[35] ={
    0x81,//header
    //T_ADR 0
    0x01,0x85,
    0x00,0x7F,0xF4,0xBB,0x00,0x10,0x40,
    0x00,0xAF,0xA0,0x0E,0x03,0x10,0x40,
    0x00,0x2F,0xF3,0x9B,0x00,0x20,0x41,
    0x00,0xAF,0xA0,0x0E,0x01,0x10,0x40,
    0x80,0x03,0x81,0x80,
  };

   if_s_write( 0x08, 0xF6 );
   delay(1);
   if_s_write( 0x08, 0x00 );

   if_write( 0x07, &tone_data[0], 35 );//write to FIFO
}

void set_ch(void){
   if_s_write( 0x0F, 0x30 );// keyon = 0
   if_s_write( 0x10, 0x71 );// chvol
   if_s_write( 0x11, 0x00 );// XVB
   if_s_write( 0x12, 0x08 );// FRAC
   if_s_write( 0x13, 0x00 );// FRAC
}

void keyon(unsigned char fnumh, unsigned char fnuml){
   if_s_write( 0x0B, 0x00 );//voice num
   if_s_write( 0x0C, 0x54 );//vovol
   if_s_write( 0x0D, fnumh );//fnum
   if_s_write( 0x0E, fnuml );//fnum
   if_s_write( 0x0F, 0x40 );//keyon = 1
}

void keyoff(void){
   if_s_write( 0x0F, 0x00 );//keyon = 0
}

void setup() {
  // put your setup code here, to run once:
  pinMode(9,OUTPUT);
  pinMode(10,OUTPUT);
  set_ss_pin(HIGH);

  SPI.setBitOrder(MSBFIRST);
  SPI.setClockDivider(SPI_CLOCK_DIV8);
  SPI.setDataMode(SPI_MODE0);
  SPI.begin();

  init_825();
  set_tone();
  set_ch();
}

void loop() {
  // put your main code here, to run repeatedly:
  keyon(0x14,0x65);
  delay(500);
  keyoff();
  delay(200);
  keyon(0x1c,0x11);
  delay(500);
  keyoff();
  delay(200);
  keyon(0x1c,0x42);
  delay(500);
  keyoff();
  delay(200);
  keyon(0x1c,0x5d);
  delay(500);
  keyoff();
  delay(200);
  keyon(0x24,0x17);
  delay(500);
  keyoff();
  delay(200);
}
To be honest, I didn’t understand it well, so I wrote it immediately.
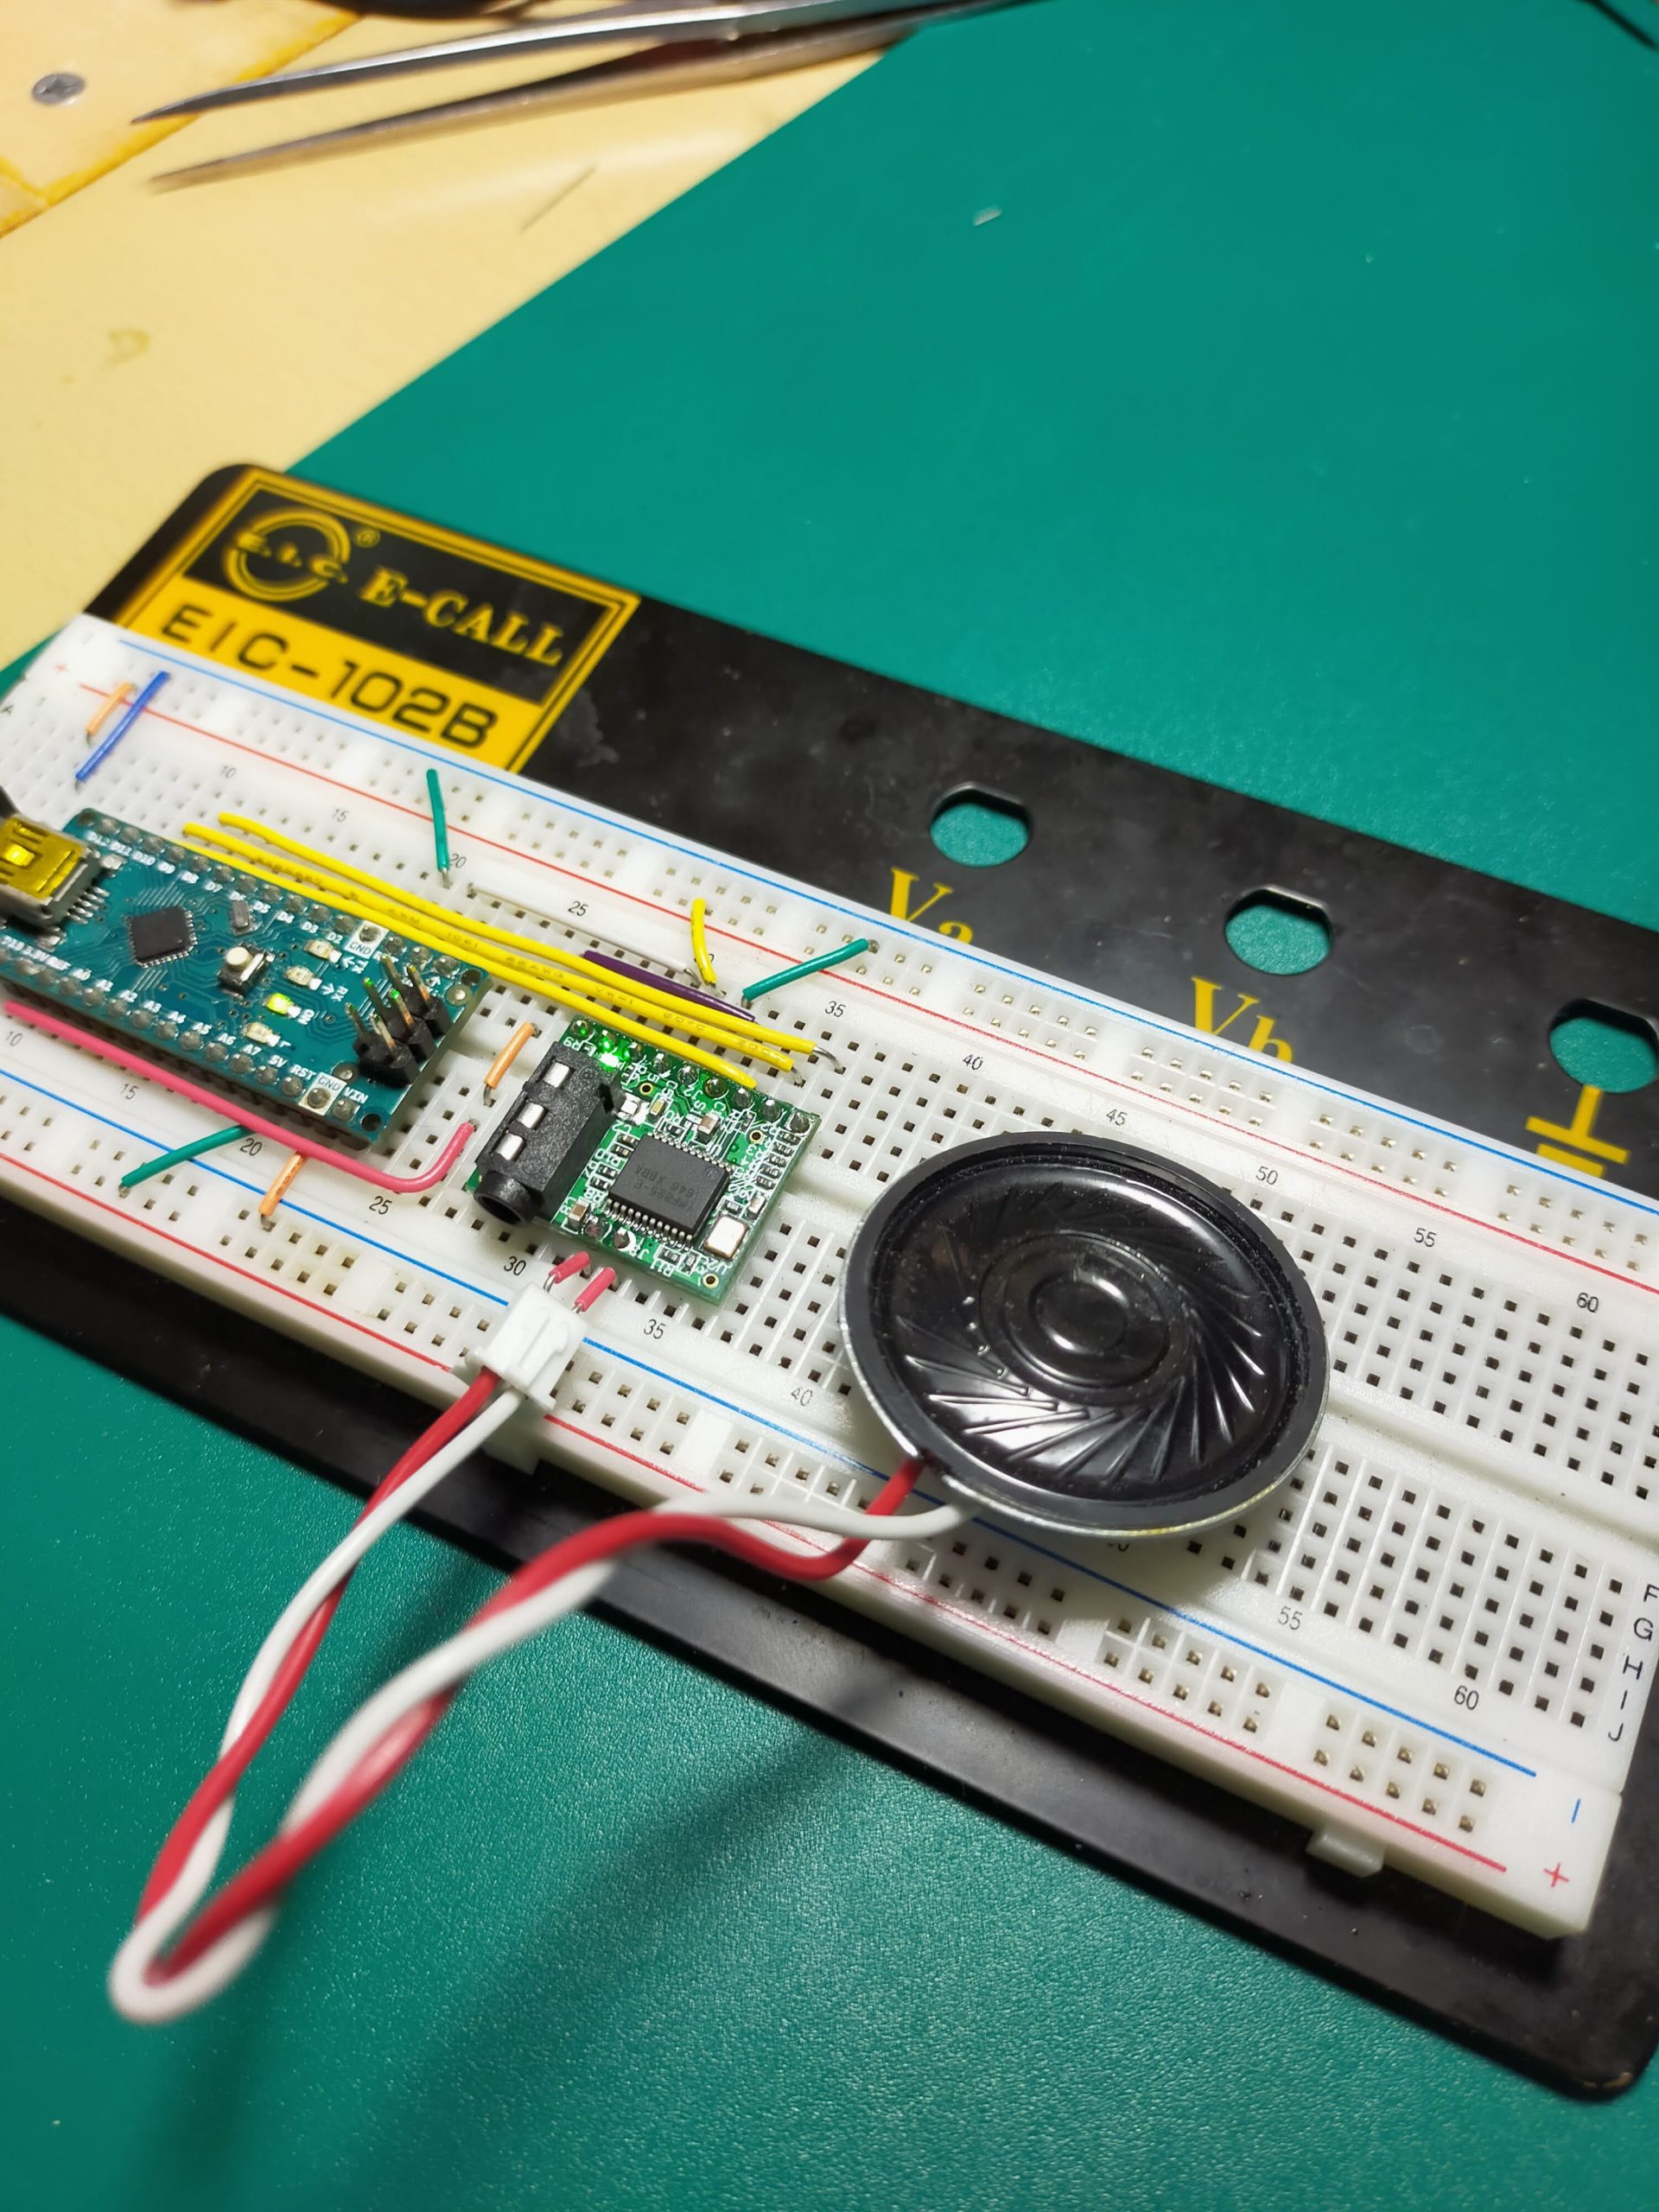
The speaker is directly connected to the SP of YMF-825.
The operation of is shown in the video below.
It seems that it repeats up to do, re, mi, fa, and so.
Apparently, it seems that the scale is played by the processing in the void loop at the bottom of this program.
void loop() {
  // put your main code here, to run repeatedly:
  keyon(0x14,0x65);    //ド
  delay(500);
  keyoff();
  delay(200);
  keyon(0x1c,0x11);    //レ
  delay(500);
  keyoff();
  delay(200);
  keyon(0x1c,0x42);       //ミ
  delay(500);
  keyoff();
  delay(200);
  keyon(0x1c,0x5d);    //ファ
  delay(500);
  keyoff();
  delay(200);
  keyon(0x24,0x17);        //ソ
  delay(500);
  keyoff();
  delay(200);
}
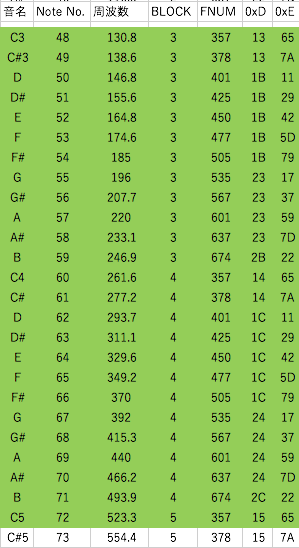
It seems that the hexadecimal number hour (0x14,0x65) in keyon determines the scale. However, the numbers are not continuous, and even if they are converted to decimal numbers, they do not seem to be frequencies.
After a lot of research, I didn’t understand how it works, but Eguchi Kazuyuki’s Qiita blog showed the scale data to be written here. It seems that the data is not always accurate, so please refer to it at your own risk.
About the scale parameters of YMF825 https://qiita.com/KazuyukiEguchi/items/8e7192a0114250f8898f
Since it is, it seems that you can use it if you refer to it from here for the scale. (Thank you very much)
Next is the tone.
Depending on the settings, it seems that various sounds can be produced, and you can freely make pianos, guitars, etc.
It is decided by the number of the array of tonedata [35] in void set_tone in the sample code.
void set_tone(void){
  unsigned char tone_data[35] ={
    0x81,//header
    //T_ADR 0
    0x01,0x85,
    0x00,0x7F,0xF4,0xBB,0x00,0x10,0x40,
    0x00,0xAF,0xA0,0x0E,0x03,0x10,0x40,
    0x00,0x2F,0xF3,0x9B,0x00,0x20,0x41,
    0x00,0xAF,0xA0,0x0E,0x01,0x10,0x40,
    0x80,0x03,0x81,0x80,
  };

   if_s_write( 0x08, 0xF6 );
   delay(1);
   if_s_write( 0x08, 0x00 );

   if_write( 0x07, &tone_data[0], 35 );//write to FIFO
}
It seems that you can change the tone by changing this arrangement.
For sample sketches of tones, I referred to Himagine’s blog.
Sample provided by Yamaha (2) https://sites.google.com/site/himagine201206/home/arduino/ymf825/030
Reprinted below. Thank you.
変換済 tonedata.txt

/*
// GrandPiano
0x01,0x43,      // modify BO:0 -> BO:1
0x00,0x67,0xFF,0x9D,0x00,0x10,0x40,
0x21,0x33,0xE2,0xA3,0x00,0x50,0x00,
0x10,0x41,0xD3,0x88,0x01,0x10,0x00,
0x21,0x62,0xD4,0x02,0x01,0x10,0x00,
*/

/*
// E.Piano
0x01,0x45,      // modify BO:0 -> BO:1
0x51,0xC4,0xFB,0x8C,0x44,0x70,0x95,
0x10,0x82,0xFF,0x12,0x45,0x10,0x00,
0x11,0xB0,0xF1,0x49,0x44,0x10,0x02,
0x11,0x72,0xFF,0x10,0x41,0x10,0x00,
*/

/*
// TenorSax
0x01,0x45,      // modify BO:0 -> BO:1
0x01,0x03,0x70,0x16,0x44,0x10,0x0B,
0x00,0x92,0x70,0x3C,0x43,0x10,0x40,
0x01,0x03,0x70,0x22,0x44,0x10,0x4B,
*/

/*
// PickBass
0x02,0x43,      // modify BO:0 -> BO:2
0x21,0x37,0xF1,0x4E,0x44,0x10,0x05,
0x41,0x6B,0xC7,0x54,0x44,0x70,0x00,
0x21,0x69,0xF2,0x5E,0x44,0x20,0x00,
*/

/*
// TnklBell
0x01,0x45,      // modify BO:0 -> BO:1
0x30,0x46,0xF5,0x41,0x44,0xE0,0x03,
0x70,0x66,0xCE,0x2E,0x44,0x20,0x00,
0x20,0x26,0xC5,0x78,0x44,0x77,0x08,
0x40,0x55,0xFD,0x04,0x54,0x60,0x00,
*/

/*
// NewAgePd
0x01,0x45,      // modify BO:0 -> BO:1
0x31,0x3F,0xF0,0x98,0x44,0x70,0x0D,
0x40,0x47,0xF0,0x2E,0x44,0x50,0x00,
0x00,0x11,0x60,0x62,0x03,0x17,0x0E,
0x00,0x51,0x81,0x02,0x03,0x10,0x00,
*/

/*
// RimShot
0x00,0x45,
0x59,0x50,0xF0,0x14,0x44,0xC0,0x17,
0x79,0x77,0xF7,0x00,0x44,0xB0,0x00,
0x68,0x6A,0xF8,0x00,0x44,0xC0,0x00,
0x78,0x77,0xF7,0x00,0x44,0x70,0x10,
*/

/*
// Castanet
0x01,0x45,      // modify BO:0 -> BO:1
0x58,0x97,0xFF,0x08,0x44,0x70,0x0E,
0x59,0xF8,0xAF,0x00,0x44,0x50,0x30,
0x68,0x55,0xF0,0x9C,0x44,0x20,0x28,
0x98,0x9A,0xCA,0x50,0x44,0x50,0x00,
*/
There are eight types of sound sources here, GrandPiano E.Piano TenorSax PickBass TnklBell NewAgePd RimShot Castanets, and it seems that you can change the tone by copying and pasting them.
That’s all for today.